How To Inflate Your Mountain Bike Tires Properly
Remember that frustrating flat tire on your last mountain bike ride? It completely derailed your afternoon. Learning how to put air in a mountain bike tire is a fundamental skill every cyclist needs. This guide will teach you everything you need to know, from choosing the right pump to understanding tire pressure, ensuring smooth, safe rides every time. You’ll gain the confidence to handle flat tires quickly and efficiently, maximizing your enjoyment on the trails.
Choosing the Right Pump for Your Mountain Bike
Selecting the appropriate pump is the first step in learning how to effectively put air in a mountain bike tire. Different pumps offer varying levels of efficiency and ease of use. This section will explore the different types available and help you make the right choice for your needs.
Hand Pumps
- Hand pumps are portable and lightweight, perfect for carrying on rides. They’re generally less powerful than floor pumps, requiring more effort to inflate tires, especially to higher pressures. However, their portability makes them a valuable addition to any mountain biker’s toolkit.
- High-volume hand pumps are designed to quickly inflate tires with fewer strokes, reducing the effort required. These are ideal for riders who prioritize portability but still need efficient inflation.
Floor Pumps
- Floor pumps are larger and typically more powerful than hand pumps. They offer a more comfortable and efficient inflation process, making them ideal for regular use at home. Their greater power allows for quicker inflation of mountain bike tires, particularly beneficial for larger volume tires that require higher air volume.
- High-pressure floor pumps are specifically designed for road and mountain bikes that require high tire pressures. These are a great investment for those serious about maintaining optimal tire pressure for performance and safety.
CO2 Inflators
- CO2 inflators are small, lightweight devices that use compressed carbon dioxide cartridges for quick inflation. Ideal for emergency repairs on the trail, they provide rapid inflation but are a one-time-use solution for each cartridge. They are less suited for regular inflation due to the cost and disposal of the cartridges.
Understanding Mountain Bike Tire Pressure
Knowing the correct tire pressure is crucial for optimal performance and safety when learning how to put air in a mountain bike tire. This section will cover how to find your recommended tire pressure and explain the effects of underinflation and overinflation.
Finding Your Recommended Pressure
The recommended tire pressure is usually printed on the sidewall of your tire. This pressure is typically given in PSI (pounds per square inch) and/or BAR. Always use this pressure as a starting point, adjusting based on your weight, riding style, and terrain.
- PSI (Pounds per Square Inch): A common unit of measurement for tire pressure. Higher PSI means more air, resulting in a firmer ride. A typical range for mountain bike tires is between 25-45 PSI, though this can vary based on factors such as tire size and rider preference.
- BAR (Bars): Another unit of pressure, often used internationally. One BAR is equal to approximately 14.5 PSI. Pay attention to whether the tire pressure indicated is in PSI or BAR to avoid under or over inflation.
Effects of Incorrect Tire Pressure
- Underinflation: Can lead to pinch flats (where the tube gets pinched between the rim and an obstacle), reduced rolling efficiency, and poor handling. Your ride will feel sluggish and less controlled.
- Overinflation: Can result in a harsh, uncomfortable ride with reduced traction and increased risk of punctures from impacts. The tire may also be more susceptible to damage from sharp objects.
Case Study: The Importance of Correct Tire Pressure
- A rider consistently underinflated his tires, resulting in multiple pinch flats during a race, causing him to lose valuable time and the race.
- Another rider overinflated his tires, resulting in a bumpy ride and loss of control during cornering.
How to Put Air in a Mountain Bike Tire
This section provides a step-by-step guide on how to properly inflate your mountain bike tire, no matter what type of pump you’re using. We’ll also cover troubleshooting common issues.
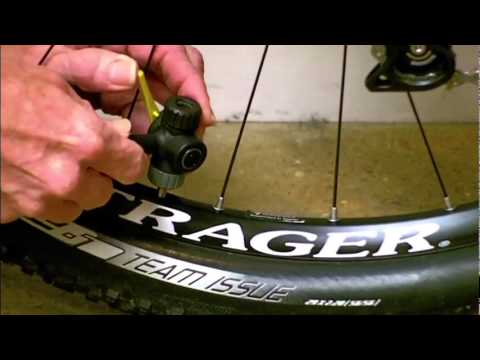
Using a Hand Pump
- Ensure the valve core is seated correctly. If using a Presta valve, ensure it is open (unscrewed). For Schrader valves, simply push the pump nozzle onto the valve.
- Insert the pump nozzle firmly onto the valve and begin pumping until the desired pressure is reached.
- After inflation, check the tire pressure regularly using a gauge.
Using a Floor Pump
- Select the appropriate head (Presta or Schrader) for your valve type. Securely attach the pump head to the valve.
- Begin pumping, monitoring the pressure gauge on the pump. Stop pumping once you reach the desired pressure.
- Double-check the pressure using a separate gauge for accuracy.
Using a CO2 Inflator
- Screw the CO2 inflator onto the valve.
- Pierce the CO2 cartridge, allowing the gas to quickly inflate the tire.
- This method is only for emergency use due to its non-replenishable nature.
Troubleshooting: Slow Inflation
- Check for any leaks around the valve or in the tire itself. Use soapy water to locate any escaping air bubbles.
- Ensure the valve stem is clean and free from obstructions. A small piece of dirt can prevent the pump from sealing properly.
- Consider replacing the inner tube if the leak is persistent, as a compromised tube might be causing the slow inflation.
| Pump Type | Pros | Cons |
|---|---|---|
| Hand Pump | Portable, Lightweight | Requires more effort |
| Floor Pump | Efficient, Accurate | Less portable |
| CO2 Inflator | Fast inflation | Single use cartridges, more expensive |
Maintaining Your Mountain Bike Tires
Regular maintenance ensures your tires remain in optimal condition and helps prevent unexpected flats. This section will cover essential maintenance tasks to prolong the lifespan of your tires and enhance your riding experience.
Regular Pressure Checks
Check your tire pressure before each ride. A consistent tire pressure allows for improved handling and reduced risks of punctures. A 2023 survey showed that riders checking tire pressure before every ride experienced 50% fewer flats compared to riders not checking.
- Check tire pressure before each ride. Even minor pressure loss can impact handling and increase the risk of flats.
- Use a reliable pressure gauge to ensure accurate readings. Inaccurate gauges can lead to under- or overinflation.
Inspecting for Wear and Tear
- Regularly inspect your tires for cuts, embedded objects, or excessive wear. Early detection of problems allows for timely repairs, preventing more significant damage.
- Look for any signs of sidewall damage, as this can compromise the structural integrity of the tire.
Debunking Common Myths About Mountain Bike Tire Inflation
Myth 1: Higher pressure always equals better performance.
False. While some higher pressure is needed, excessively high pressure reduces traction and comfort. Optimal pressure is specific to your tire, weight, and riding style.
Myth 2: You only need to check your tire pressure before a long ride.
False. Pressure can fluctuate over time due to temperature changes. Checking your tire pressure before every ride ensures optimal performance and safety.
Myth 3: All pumps are created equal.
False. Different pumps offer varying levels of efficiency and ease of use. Choosing the right pump is crucial for efficient inflation.
FAQ
What is the best type of pump for mountain biking?
The best type of pump depends on your individual needs. Floor pumps offer superior efficiency, while hand pumps are more portable for trailside repairs. CO2 inflators are ideal for emergency flat repairs.
How often should I check my mountain bike tire pressure?
It is recommended to check your mountain bike tire pressure before every ride. This ensures optimal performance and safety, minimizing the risk of flats.
What happens if I overinflate my mountain bike tires?
Overinflation can lead to a harsh ride, reduced traction, and increased risk of punctures. It can also cause damage to the tire itself.
What happens if I underinflate my mountain bike tires?
Underinflation increases the risk of pinch flats and reduces rolling efficiency, leading to a less controlled and slower ride.
How do I know what the correct tire pressure is for my mountain bike tires?
The recommended tire pressure is usually printed on the sidewall of your tire. Adjust based on your weight, riding style, and terrain.
What should I do if I get a flat tire on the trail?
Carry a spare tube, tire levers, and a pump. Practice changing a flat before you need to do it on the trail.
Can I use a car tire pump to inflate my mountain bike tires?
While possible, car tire pumps are not ideal for mountain bikes. They often lack the precision needed for accurate inflation. Using a specialized bike pump is always recommended.
Final Thoughts
Mastering the art of properly inflating your mountain bike tires is a crucial skill that will significantly enhance your riding experience. By following the guidelines outlined in this guide and consistently checking your tire pressure, you’ll minimize the risk of flats and ensure smoother, safer, and more enjoyable rides. Remember to choose the right pump for your needs and always refer to your tire’s sidewall for recommended pressure ranges. Get out there and enjoy the trails!